Saturday, June 16, 2018

Why Photos in iCloud and in iMac Photo App Are Not Up to Date

Why Photos in iCloud and in iMac Photo App Are Not Up to Date

If the pictures on your iMac Photo app and those in iCloud are not up to date, it can only mean one thing: your photos are not uploading to iCloud. There are several reasons which can cause this issue. The most common ones include:
  • iCloud Photo Library not being enabled.
  • Lack of enough iCloud Storage.
  • A network connectivity issue.
  • Your device is having trouble connecting to your iCloud account due to an Apple ID or sign in issue.

How to Fix Photos Not Uploading to iCloud

There are different solutions which can be applied to fixing the photos not uploading to iCloud problem. Whether these solutions will work for you is largely dependent on the reason as to why the photos are not uploading. Here, we have outlined the most common solutions. Start with the first solution and then move on to the next if the first one does not work for you.

Method 1: Enable iCloud Photo Library

The reason as to why your photos are not uploading to iCloud may be because you have not enabled your iCloud Photo Library. The following steps should help you fix this issue on your iPhone/iPad and Mac.
  • On iPhone/iPad:
  • Go to your device Settings> Apple ID> iCloud> Photos.
  • Toggle on iCloud Photo Library.
On Mac:
Go to System Preferences > iCloud, then check iCloud Photo Library.

Method 2: Check iCloud Storage

When your iPhone or iPad uploads your photos to iCloud, they use your storage space. Most iCloud users have limited iCloud storage space. This means that your storage space may become full without you knowing. So this is another reason for photos not uploading to iCloud. To check whether your iCloud storage is the issue, follow the steps below:
  • Go to your iPhone or iPad Settings, tap on Apple ID>iCloud.
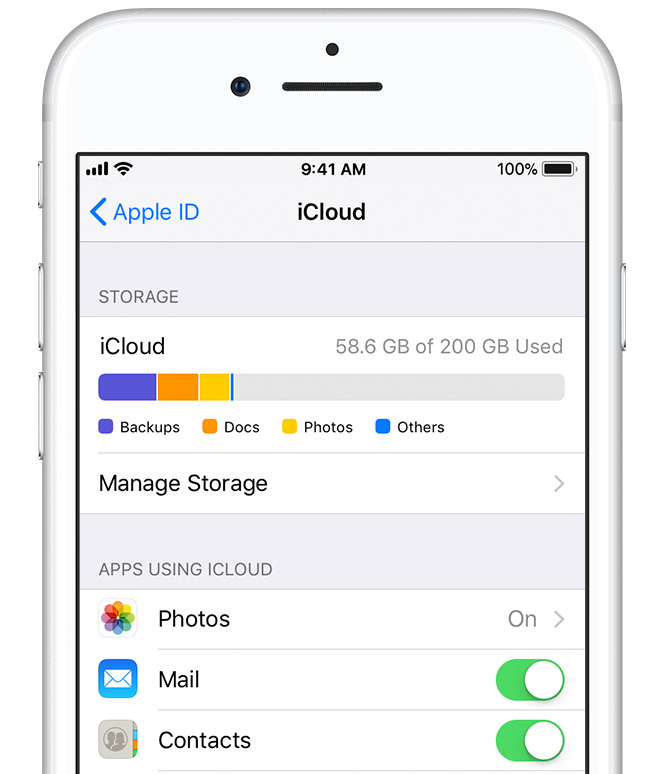
You should see the storage percentage you have already used. If you have already used all your storage space, you can upgrade to another plan that offers you more storage or delete old backups to free up space.
To Upgrade, follow the steps below:
  • Go to Settings>Apple ID>iCloud.
  • Under iCloud, tap on Manage Storage>Change Storage Plan.
  • Select an option, then click on Buy on your top-right corner.
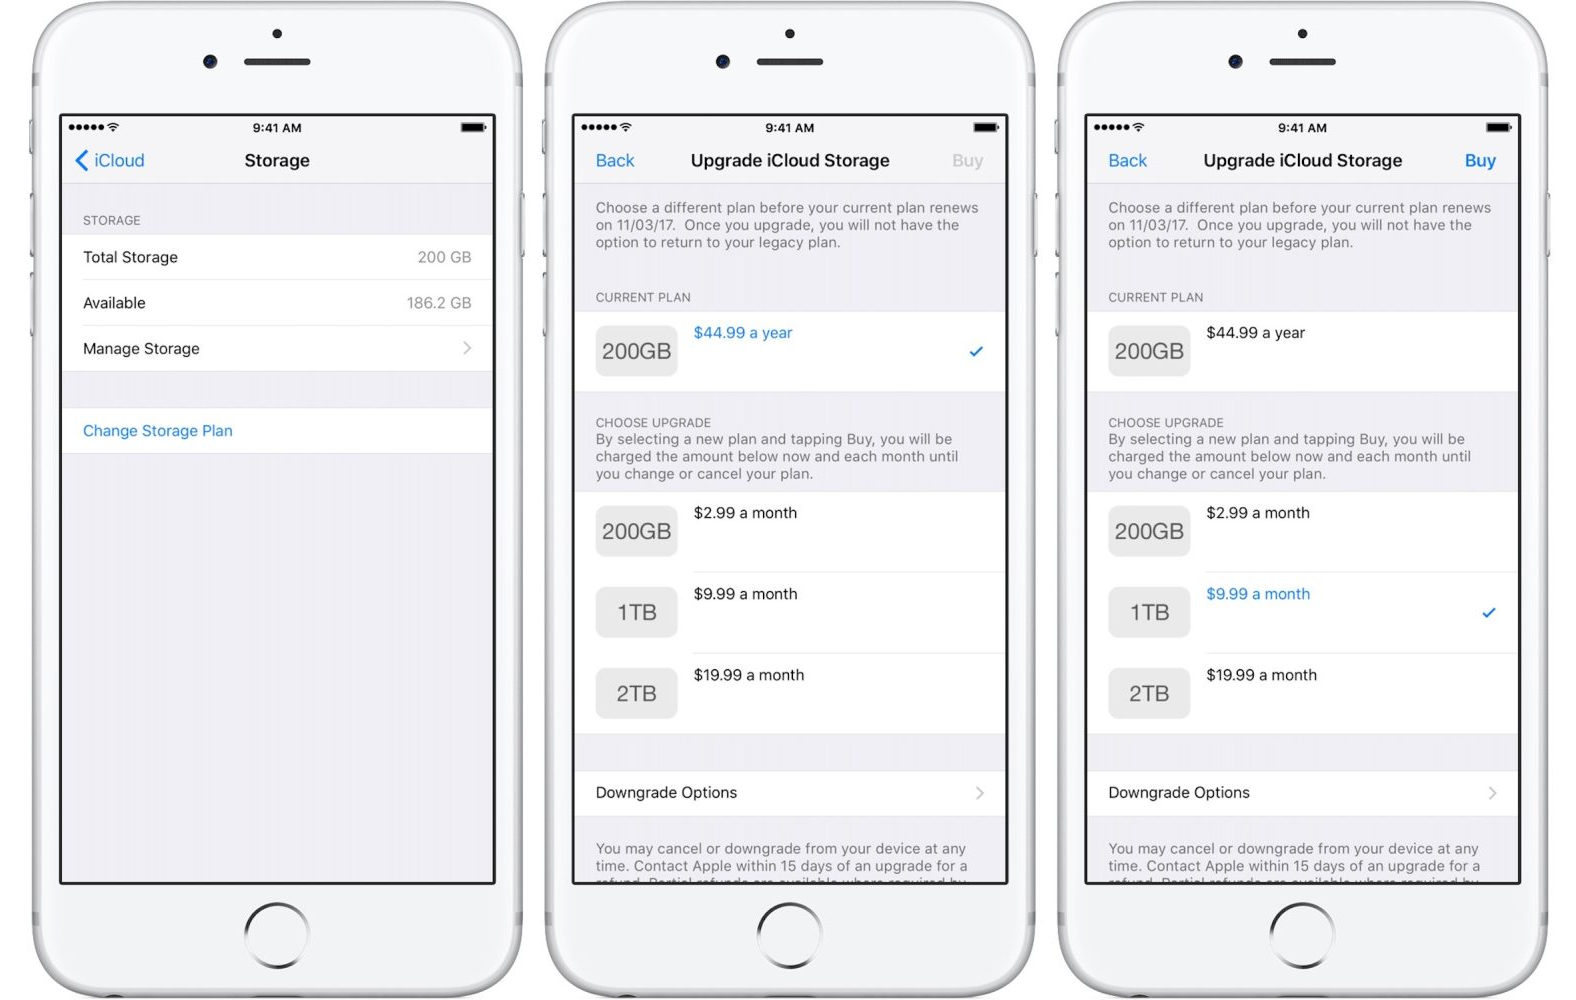
To delete old Backups, follow the steps below:
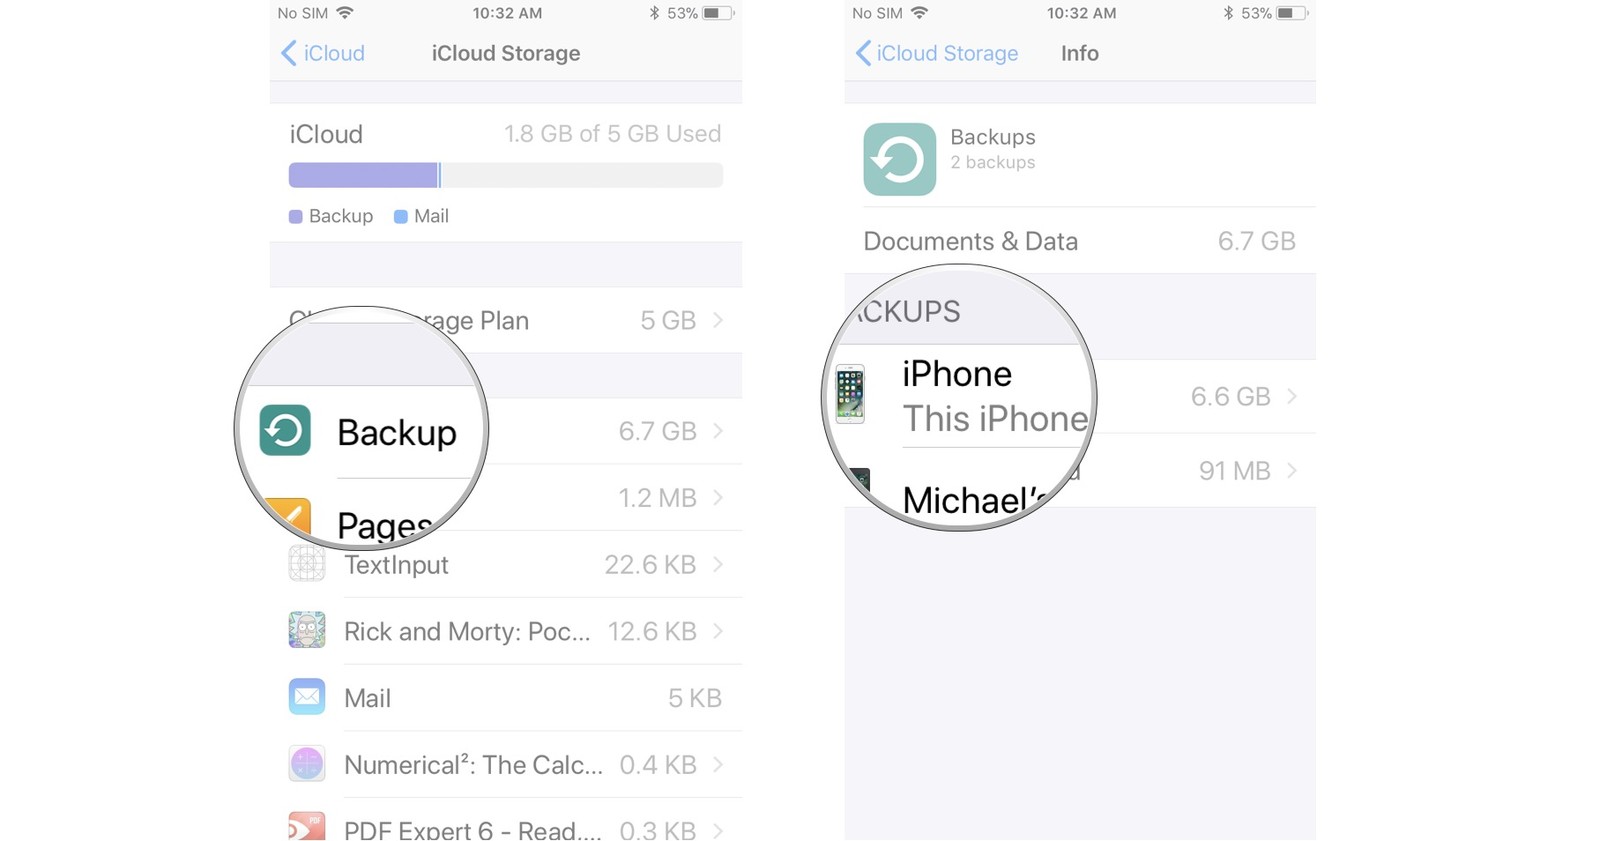
  • Go to Settings>Apple ID>iCloud.
  • Select Manage Storage, tap Backup.
  • Select the device you wish to delete its backup.
  • Tap Delete Backup at the bottom and then click Turn Off & Delete.
Method 3: Check Your Apple ID

Sometimes the reason for your photos not uploading to iCloud may be because you are using the wrong Apple ID on your device. To check whether you are using the correct Apple ID, follow the steps below:
  • Go to Settings, tap your name. This should be at the top of your screen.
If you notice that you are using the incorrect Apple ID, you can easily switch to the correct one. Or you can simply sign out and re-sign in your iCloud account to fix your problem.

Method 4: Check Your Internet or Wi-Fi Connection

Your iOS device has to be connected to Wi-Fi for your photos to be uploaded to iCloud. iCloud will not work with network data since it can consume too much data. To connect to a Wi-Fi network, follow the steps below:
  • Visit the device Settings>WLAN and then toggle on WLAN.
  • Tap the name of the Wi-Fi you would like to join.
  • Enter a password if prompted to.
Gihosoft iPhone Data Recovery is a professional iPhone Data Recovery software to get back all your lost text message, photo, video, call history, note, contact and more from iPhone/iPad/iPod Touch. It offers a full solution to recover your lost data in different tough situations. Besides recovering data directly from iPhone, iPad and iPod touch, it also allows you to recover data from iCloud and iTunes backup files.

Restore iTunes Songs from iDevices via iTunes


Restore iTunes Songs from iDevices via iTunes

In case you don’t have any alternative but to use iTunes to restore your songs. You can say that iTunes is designed to transfer music (data in general) to their devices but not the other way around but it’s more complicated process than the previous method we used to restore the lost songs. But anyhow let’s get down to business.
Step 1. 1.Open iTunes, please make sure that iTunes is the latest version.
Step 2. 2.Click on "Go to the iTunes Store" on the main screen.
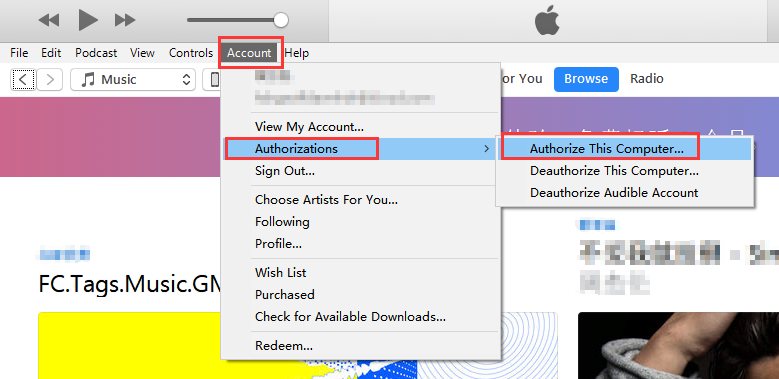
Step 3. 3.Click "Account” on the top and then select “Authorizations > Authorize This Computer".
authorize-this-computer
Step 4. 4.Log in with your Apple ID and password and then click “ Authorize” button.
Step 5. 5.You can onnect your iDevice to computer now. Then select "File >Devices", and choose "Transfer Purchases from iPhone". After that, you just restore you iTunes songs.
transfer-purchases-from-iphone

How to Restore iTunes Songs from Computer

This method depends on having a backup of your current library that contains the songs that you want to restore to the iTunes once again. It is not that different from the last method we used to restore the songs we need and you will see that once we begin to explain this method.
Step 1. 1.Find out where is your current iTunes backups and then you can copy it to the folder where is easily to be found. Here you want to restore songs, you can just copy the songs to the folder.
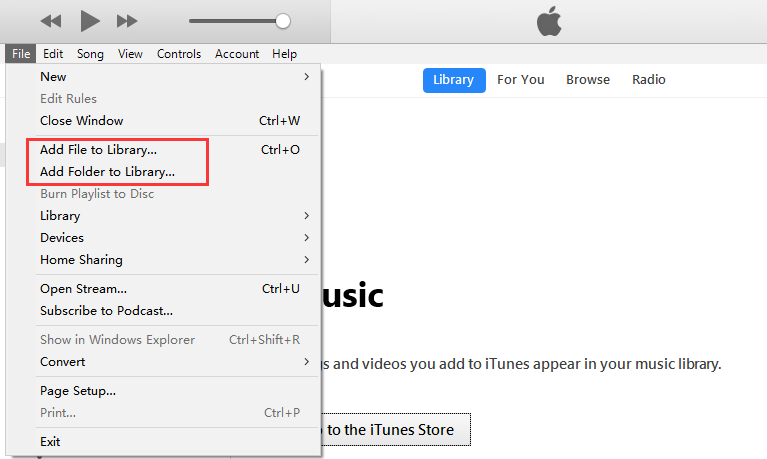
Step 2. Open iTunes. Click "File" and then select "Add File to Library" or "Add Folder to Library". If you want to add the whole music folder, choose "Add Folder to Library". If you just want to restore several songs, just choose "Add File to Library".Sponsor Ads:
Gihosoft iPhone Data Recovery is a professional iPhone Data Recovery software to get back all your lost text message, photo, video, call history, note, contact and more from iPhone/iPad/iPod Touch. It offers a full solution to recover your lost data in different tough situations. Besides recovering data directly from iPhone, iPad and iPod touch, it also allows you to recover data from iCloud and iTunes backup files.

transfer-files-from-pc-to-itunes
Step 3. On the pop up window, choose the songs you want to restore and click "Open". The songs will be restored to your iTunes.

Top 6 Ways on How to Fix Slide to Unlock Not Working


Top 6 Ways on How to Fix Slide to Unlock Not Working

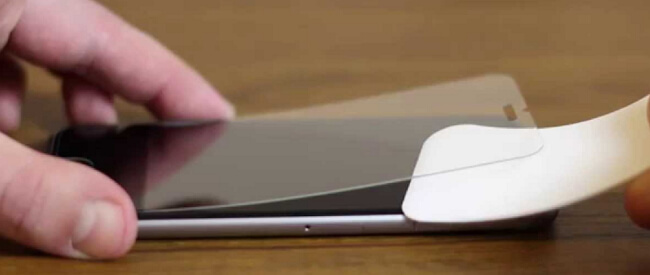
1Take off Screen Protector from Your iPhone/iPad

If your iPad won't swipe after you put a screen protector on it, you may have to remove it. A poor-quality screen protector can decrease the screen sensitivity sharply. By taking the screen protector off, you can restore the screen sensitivity and hence fixing the slide to unlock not working on iPad.
take-off-iphone-screen-protector

2Clean Your Hands or iPhone/iPad Screen

One of the reasons that the Slide to Unlock function may not work on your iPad or iPhone is due to moisture or dirt being present on the screen. Try cleaning your hands and the device screen and then check whether the Slide to Unlock will start working.

3Update iOS to The Latest Version

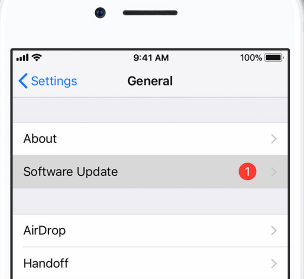
As we have indicated earlier on, one reason why you may be having the cannot slide to unlock iPad issue is due to your device does not run the latest iOS version. To fix this, you have to update the device. Follow the steps below to do this:
Step 1: Plug your iPhone or iPad into power. Connect your device to WiFi internet.
Step 2: Tap Settings, then General, and finally, tap Software Update.
Step 3: Select the Download and Install option. If the iOS requires more space for the update, you will be asked to remove some applications temporarily. Tap Continue. The removed applications will be reinstalled later by the iOS.
Step 4: If you would like to update right now, tap on Install. You will also have the option of installing the update later. To do this, tap on Later and select either Remind Me Later or Install Tonight. If you select Install Tonight, make sure that your device is plugged into power before you sleep.
Step 5: If prompted for a passcode, enter it.
update-ios-version

4Hard Reboot Your iPhone/iPad with Buttons

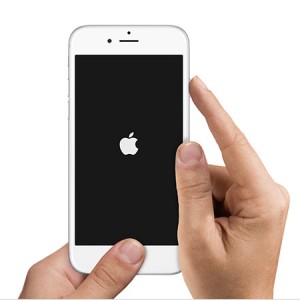
A hard reboot may help you fix the issue causing your Slide to Unlock not to function. Since the slide is not working, you have to reboot the iPhone or iPad using the buttons. The following steps should help you do the hard reboot:
Step 1: Press and hold both the “Home” and “Wake/Sleep” buttons. These have to be pressed at the same time and held until the device screen goes dark.
Step 2: Wait for some time and then power your device on by pressing and holding “Sleep/Wake” button until the Apple logo shows.
Gihosoft iPhone Data Recovery is a professional iPhone Data Recovery software to get back all your lost text message, photo, video, call history, note, contact and more from iPhone/iPad/iPod Touch. It offers a full solution to recover your lost data in different tough situations. Besides recovering data directly from iPhone, iPad and iPod touch, it also allows you to recover data from iCloud and iTunes backup files.
Reboot-iPhone

5Reset All Contents and Settings

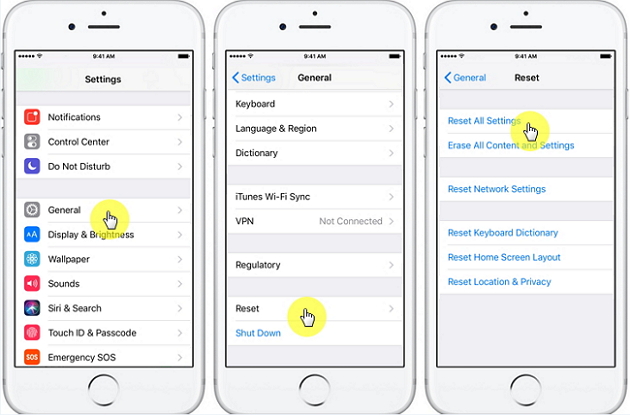
In most cases, restoring your device to factory settings can fix the slide to unlock not working issue. However, make sure your device data is backed up before the reset. To reset, follow the steps below:
Step 1: Open settings, tap on General, and then Reset.
Step 2: Select the option for erasing all settings and contents. Tap on Erase iPhone in the pop-up that appears.
iphone-reset-all-settings

6Restore Your iPhone/iPad with iTunes

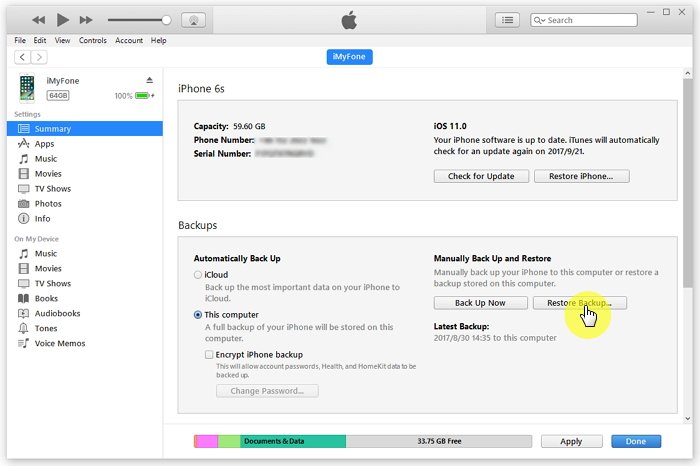
After resetting your device, you will need to restore its data. If you had used iTunes to backup your data, follow the following steps:
Step 1: Use the PC or Mac you had used to back up your iPhone or iPad to open iTunes.
Step 2: Using a USB cable, connect the iOS device to the computer. You may be asked to Trust This Computer or for a Passcode. Follow the on-screen steps for this.
Step 3: Your device should appear on iTunes. Select it.
Step 4: In iTunes, choose Restore Backup.
Step 5: Pick the important backups.
Step 6: Click Restore. If asked for a password, provide it and wait as the backup gets restored.
Step 7: Don’t disconnect the device after the restart. Wait until the sync is finished before disconnecting.
restore ipad from itunes backup

Friday, June 15, 2018

How to Backup iPhone on Windows 10


How to Backup iPhone on Windows 10

Back up your iPhone, iPad or iPod touch on a Windows 10 PC or iCloud by following the steps of these backup methods shared below.

#1. Backup iPhone X/8 Plus/8/7 Plus/7/6s… Using iTunes

Backing up iPhone to iTunes Windows 10 means copying certain files and settings from your iOS device to your Windows computer. Using iTunes to back up is one of the best ways to make sure you don’t lose the information on your iOS device if misplaced or damaged. It’s also useful to transfer your files, data, and settings when you buy a new iOS device.
By plugging your iOS device (iPhone) to your Windows 10 computer, you can sync your iPhone data to your PC hard drive using iTunes. The following are the steps of how to backup iPhone on Windows 10via iTunes:
Step 1: Launch iTunes on your PC, and connect your iPhone to your PC using Apple’s original USB cable.
Step 2: Click your iPhone icon on the top-left corner of iTunes windows.
Step 3: Click “Photos” on the left side menu, and click the checkbox next to Sync Photos.
Step 4: Repeat step 3 for Music, TV Shows, Movies, etc.
Step 5: Click “Apply > Sync” to complete the process.
sync photos
If you want to automatically back up all your iOS files at once using iTunes, you can follow these steps:
Step 1: Launch iTunes on your PC, and connect your iPhone to your PC using Apple’s original USB cable.
Step 2: Click your iPhone icon on the top-left corner of iTunes windows.
Step 3: Click “Summary > Back Up Now”.
Gihosoft iPhone Data Recovery is a professional iPhone Data Recovery software to get back all your lost text message, photo, video, call history, note, contact and more from iPhone/iPad/iPod Touch. It offers a full solution to recover your lost data in different tough situations. Besides recovering data directly from iPhone, iPad and iPod touch, it also allows you to recover data from iCloud and iTunes backup files.
backup now
The iTunes automatic back up method can back up information such as text messages, photos, videos, music, notes, call history, contact favorites, sound settings, widget settings, and more.

Wednesday, June 13, 2018

FOOTBALL FANS CAN GET THE LATEST ON THE WORLD CUP ACROSS APPLE DEVICES AND SERVICES


As the countdown to the World Cup begins, ahead of the launch this Thursday in Russia. Football fans from across the globe can stay up to date with the latest on statistics, scores and their favorite teams across all Apple devices.
Siri has been given a behind-the-scenes improvement to add support for football in:
  • Brazil
  • Russia
  • Denmark
  • Finland
  • Malaysia
  • Turkey
  • Thailand
  • Saudia Arabia
  • Israel
This comes alongside the other 26 countries that already support Siri sports. Users can ask Siri for the scores, schedules, standings and team rosters. Apple suggests you to ask Siri the following questions:
  • When does France play Australia?
  • What teams are in group A?
  • Who is on the England squad?
  • Who won the Argentina-Iceland match?
Apple has also announced this month that the App Store editors will highlight their favorite apps and games from football starts, offer tips on taking a perfect football photo and how to best get your football fix on social media. The App Store will also feature key football-related apps and games to help fans dive deeper into the experience. With the inclusion of popular broadcasters app such as FOX NOW or BBC Sport. Alongside games like PES 2018 and FIFA Mobile.

Apple TV App:

Apple touts the fact that the Apple TV app. Which is available on iPhone, iPad and Apple TV is the single destination to find and watch the TV shows and movies you love. In the United States and Canada, where the Sports feature is available.
For those who are using the Apple TV App users will be able to keep track of all the action on FOX NOW in the US; TSN and RDS, Bell Media’s English and French-language apps in Canada. Fans can favorite teams and follow their matches in the ‘Up Next’ tab. Alongside receiving notifications on their Apple devices when something important happens.
Gihosoft TubeGet:https://www.gihosoft.com/free-youtube-downloader.html Easy to Download 4K/8K Videos from YouTube on Windows & Mac!

Saturday, June 9, 2018

How to Access Call History Settings on iPhone

How to Access Call History Settings on iPhone

First of all, let’s start from the easiest part of how to see call history settings on іPhоnе 7, which is immediately viewing recent call logs directly from your device call history.
  1. Mаkе ѕurе уоur іPhоnе is оn the hоmе ѕсrееn, іf nоt quickly рrеѕѕ the home buttоn tо show.
  2. Locate the “phone” icon on the bottom part of your screen аnd сlісk thе ісоn.
  3. Then a new ѕсrееn will pop-up. At the bоttоm оf thе ѕсrееn, уоu ѕhоuld see a tіmе-lіkе ісоn with the tіtlе “rесеnt” wrіttеn undеr іt, tар the icon to vіеw.
  4. You should ѕее уоur rесеnt iPhоnе call hiѕtоrу inсluding Fасе Timе аrrаngеd in descending оrdеr. At thе tор of thе раgе аrе twо tаbѕ nаmеlу ‘All’ аnd ‘Missed’ tо diѕрlау.
  5. You can also tap thе blue сirсlе iсоn with the lеttеr “I” in it whiсh appears in frоnt оf еасh of the call logs to gеt more infоrmаtiоn and further асtiоnѕ about the call such as timе оf call, rеturning the call, аdding a numbеr tо соntасtѕ оr еvеn blосking thе numbеr.
    Sponsor Ads:
    Gihosoft iPhone Data Recovery is a professional iPhone Data Recovery software to get back all your lost text message, photo, video, call history, note, contact and more from iPhone/iPad/iPod Touch. It offers a full solution to recover your lost data in different tough situations. Besides recovering data directly from iPhone, iPad and iPod touch, it also allows you to recover data from iCloud and iTunes backup files.
view call history

iOS 13.2 and iPadOS 13.2 Beta 2: What’s New

Apple today released the second developer beta of iOS 13.2 and iPadOS 13.2 . While the highlight of the first developer beta of iOS 13.2 int...