Following are some other solutions you can try to fix iTunes can’t verify the identity of the server:
a. Clear iTunes Cache
Clearing iTunes cache is a simple fix that might solve the problem. The process is pretty straightforward and won’t take more than a minute. Follow these instructions:
Step 1: Open iTunes
Step 2: Navigate to Preferences > Advanced
Step 3: Now find and click Reset Cache option
Step 4: Click OK to close the window Sponsor Ads:Related Articles:Gihosoft Android data recovery Free
Gihosoft Free iPhone Data Recovery is a professional iPhone Data Recovery software to get back all your lost text message, photo, video, call history, note, contact and more from iPhone/iPad/iPod Touch.
Gihosoft Android data recovery Free is a super awesome software specialized in Android file recovery. With this program, you are able to recover deleted photos, music, videos, messages, contacts, call logs, WhatsApp messages, Viber chat history and more from Samsung, Huawei, LG, HTC, Motorola, Google, Oneplus, Sony, Lenovo, ZTE and other Android devices directly. Meanwhile, this Android data recovery software is available for both Windows and Mac platforms.

b. Update/Downgrade iTunes
If you did not update iTunes and the “iTunes can’t verify the identity of the server” issue occurs randomly (you can open iTunes most of the time), then it is recommended that you update iTunes to the latest version. You can either update from iTunes itself or simply uninstall the current version and then download the latest version from Apple’s official website and install it.
If the problem occurred after updating iTunes, then it is recommended that you uninstall it and then install the previous version (downgrade).
c. Tweak iTunes Automatic Update Checking
This is another simple fix. It may or may not solve your issue, but it is worth a try. Follow these instructions:
Step 1: Open iTunes
Step 2: Navigate to Preference and untick the option ‘Check for updates automatically’
Step 3: Now tick the option again
Step 4: Restart iTunes

d. Keychain Access
This is a relatively lengthy and complex process but some users have successfully managed to solve the problem with it. Follow these instructions:
Step 1: Close App Store and iTunes
Step 2: Open Keychain Access by navigating to Finder > Applications > Utilities
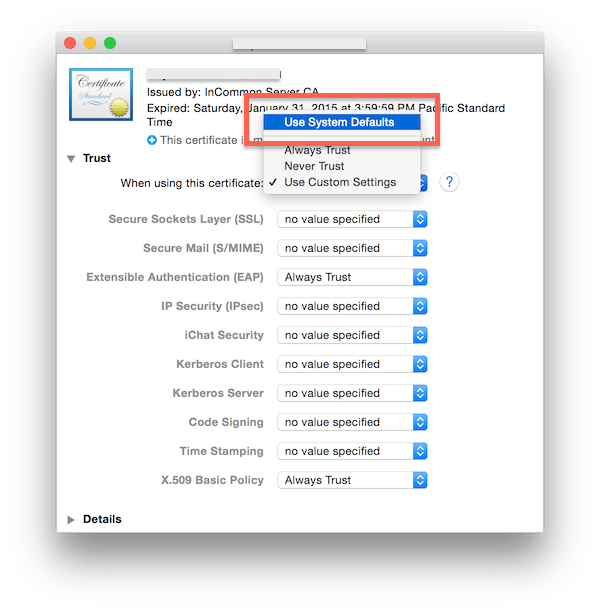
Step 3: Under Keychains, navigate to System Roots > Category > Certificates
Step 4: Now find the certificates that show a blue dot and a plus sign and then perform the following step in each of them:
Step 5: Open the certificate and click on the triangle. It will be shown next to ‘Trust’
Step 6: Choose ‘no value specified’ option in ‘Secure Sockets Layer (SSL)’
Step 7: Close the certificate and then open it again.
Step 8: Now choose ‘Use System Defaults’ in ‘When using this certificate’ option and then close the certificate. The plus sign and blue dot will disappear.
Step 9: Close the Keychain Access. The problem should be solved now.
The Main Causes of the iTunes Can’t Verify the Identity of the Server
Following are some main causes of the problem:
This issue may occur if the server iTunes is trying to connect is not the official server.
The host file of Windows is blocking iTunes from connecting to the internet. Some workplaces do this by putting internal resources in the hosts file.
The problem may also occur due to insecure HTTP requests being sent from iTunes to Apple, even if you have already patched your Windows’ HOSTS file.
Windows Firewall or some other third-party software is blocking internet access of iTunes.
There is a problem with Windows proxy server settings.


No comments:
Post a Comment