Monday, July 30, 2018

Fix iPad Black Screen of Death (iOS 12 Included)


Fix iPad Black Screen of Death (iOS 12 Included)

Restore iPad to Factory Settings Using iTunes (Data Loss)

Here is the last method you can try by your own. It is restoring the iPad to factory settings using iTunes. We must however warn you that this will erase all the contents and settings on the iPad.

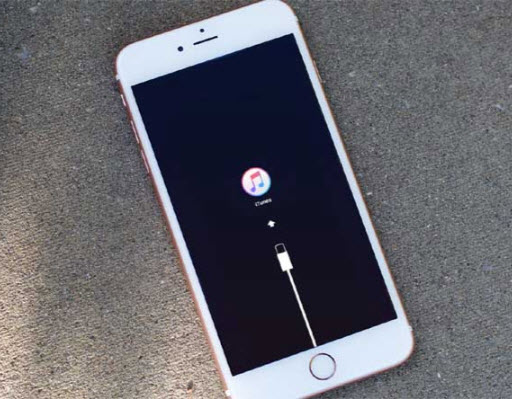
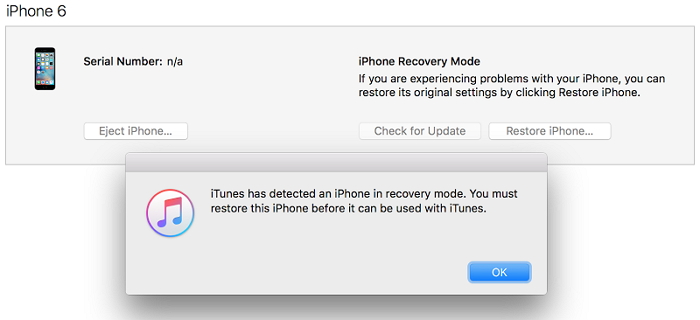
Step 1: Install the latest iTunes on your system. Start iTunes and establish a connection between your computer and iPad.

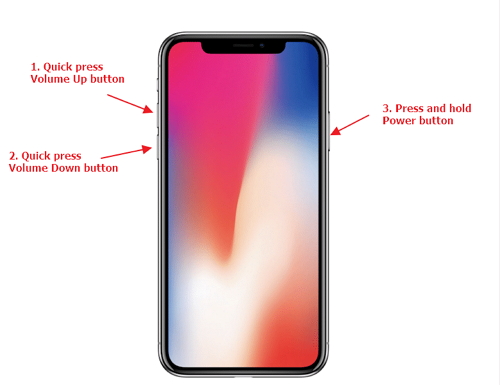
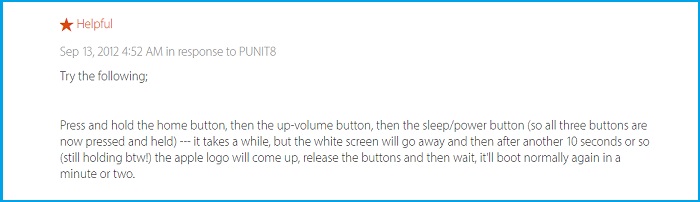
Step 2: Hold the power button and the home button until iTunes displays message that it detected the device and is now ready for restoration.

Step 3: Click OK button. From the right pane of the screen, choose "Restore iPad" option.

Step 4: Pressing the button will allow the iTunes to erase all the content from your iPad, including data and settings.

Step 5: After iTunes completes the installation process, your iPad restarts automatically. You have to set up the device and begin using it as a new gadget.


Note: Restoring iPad to factory settings will erase all all the contend on your iPad. Keep in mind to back up your iPad to computer or with iCloud, so that you can restore the backup to iPad without affecting the other data. If unfortunately, you are not able to backup your iPad anymore, we recommend that you check it at Apple store to see if the support team can get the data off when iPad screen goes black.Sponsor Ads:
Gihosoft Free iPhone Data Recovery is a professional iPhone Data Recovery software to get back all your lost text message, photo, video, call history, note, contact and more from iPhone/iPad/iPod Touch. It offers a full solution to recover your lost data in different tough situations. Besides recovering data directly from iPhone, iPad and iPod touch, it also allows you to recover data from iCloud and iTunes backup files.
iPhone backup unlocker:Recover iTunes Backup Password.
iPhone backup extractor free:The best iPhone Backup Extractor software to extract photos, text messages, contacts, voice memos, note, WhatsApp, Viber and etc from iPhone/iPad backup.


Tuesday, July 24, 2018

How to fix iPhone White Screen of Death?


 How to fix iPhone White Screen of Death?

Why iPhone Stuck on White Screen of Death

There are many reasons that can lead to iPhone stuck on white screen of death, including hardware issues, damage from frequent falls, improper iOS 12 update, a jailbreak that didn't work, software crash, and so on. However, three of the most common things that trigger the problem are explained below.
Most of the times, when an iOS firmware update fails, you are likely to get the trouble. Putting simply, if you update your iPhone to the new iOS such as iOS12, and the device doesn't get successfully update, your device might get stuck to white screen of death. Another thing that could trigger the white screen problem is a jailbreak failure. Besides, system failures or system crash could also be a common reason that causes iPhone white screen problem.
If we talk about the hardware, the white screen problem can be the result of loose connection of the cable which is responsible of connecting iPhone's motherboard to the computer. Also, a damaged USB cable and the breaking of motherboard after your phone is dropped can be the reason too.

1. Check If Screen Magnification Is On

First of all, make sure to check the screen magnification is not enabled. This feature lets the users zoom the screen to an extra level. And maybe you have super zoomed the screen and it is stopped on something white giving you a wrong idea of white screen of death.
Hence, to fix this, get your three fingers together and double tab on the screen with those fingers. The screen will be back to normal in case it is magnified. Now, disable the feature if you want to. Go to 'Settings' > 'General' > 'Accessibility' > 'Zoom' > 'Off'.If you lost videos from iOS Camerall Roll which are nowhere to download again, you can use Gihosoft iPhone Data Recovery to get back deleted videos from iOS device including iPhone, iPad and iPod Touch.
Jihosoft iPhone Backup Extractor Extract and recover all types of data from iPhone backup files, such as camera roll photos, videos, SMS, contacts, reminders, WhatsApp, and etc.
Gihosoft Android data recovery Free is a super awesome software specialized in Android file recovery. With this program, you are able to recover deleted photos, music, videos, messages, contacts, call logs, WhatsApp messages, Viber chat history and more from Samsung, Huawei, LG, HTC, Motorola, Google, Oneplus, Sony, Lenovo, ZTE and other Android devices directly. Meanwhile, this Android data recovery software is available for both Windows and Mac platforms.

turn off zoom

2. Hard Reset Your iPhone

A hard reset can fix most issues. Try it before attempting any more invasive procedures. To do it, press the Home button (Volume Down button if you use iPhone 7) and the Sleep/Wake button at the same time for no less than 10 seconds or until you see the Apple Logo.
The iPhone will reboot automatically and begin to work normally again.
Hart Reset Your iPhone
If you are using iPhone 8 or iPhone X, quick press the Volume Up and then Volume Down buttons. Then keep holding the side button of iPhone 8 or iPhone X until you see the Apple logo.
force restart iPhone X

3. Hold Three Buttons Together

Press home switch, up-volume switch, and power switch all together. Hold them for a short while or until you see the Apple logo show up on the screen. At the point when the logo shows up, your iPhone will reboot automatically and begins to work in the normal state.
Press home switch, up-volume switch, and power switch all together

4. Restore iPhone with iTunes (Erase Data)

Restoring the device has helped many times to users and can help you too when your iPhone is stuck on white screen of death. Make sure to have the latest version of iTunes in your PC. If iTunes is not updated, get it downloaded first. Now, follow the steps given below.
  • Open iTunes and get your iPhone plugged with the computer via USB cable.
  • Now put your iPhone into Recovery Mode because iTunes will not recognize your iPhone when it is stuck in white screen of death. You can refer to this guide to set your iPhone in recovery mode.
  • iPhone in recovery mode
  • Then iTunes will detect your iPhone in recovery mode. You will be offered with the option to restore your iPhone.
  • Lastly, click on 'OK' and then on 'Restore iPhone' and your device will be restored to factory settings. Once it restarts, you can set up your iPhone like a new one.
restore iPhone with iTunes

How to reset an iPhone to its factory settings


How to reset an iPhone to its factory settings

Apple iPhone X
Perhaps you're gifting your old iPhone to a friend, or maybe you've decided to sell it to the highest bidder before the next one is released. Whatever the case, it's probably a good idea to wipe your data and return the phone to its original settings before you move on to the next one. If your iPhone's been getting sluggish, a factory reset might clear the decks of potential software hiccups that've been holding you back.
Fortunately, resetting an iPhone is about as easy as it gets thanks to Apple's intuitive, easy-to-navigate menu software.Sponsor Ads:
Gihosoft Free iPhone Data Recovery is a professional iPhone Data Recovery software to get back all your lost text message, photo, video, call history, note, contact and more from iPhone/iPad/iPod Touch. It offers a full solution to recover your lost data in different tough situations. Besides recovering data directly from iPhone, iPad and iPod touch, it also allows you to recover data from iCloud and iTunes backup files.
1. Open the Settings app.
2. Select "General."
3. Scroll down to the bottom of the General settings menu.
4. Select "Reset."
5. From here, you can choose "Reset All Settings" or "Erase All Content and Settings."
6. To completely wipe your phone, select "Erase All Content and Settings."
Your iPhone will ask if you're sure (are you?), but once you approve the request, your iPhone is as good as wiped.

How to reset an Android to its factory settings

Samsung Galaxy Note 8
The process of resetting an Android phone is slightly different than it is on iOS, but that's to be expected. After all, not every Android phone features the same basic software and design language across different devices. Thankfully, the actual nuts and bolts of the process—regardless of the Android device in question—is easy as pie.
Like the iPhone, the reset option for an Android phone can be found in the phone's settings app. From there, you'll want to find the phone's general settings submenu. This menu could potentially be labeled "General management," "Basic," or "System," so tap around until you find it.
From here, the process is a breeze: Just select "Reset" (or whatever its equivalent might be) and confirm your actions.

Thursday, July 12, 2018

8 Secret iPhone X Tips and Tricks You Might Not Know About 2018


I’ve been using the iPhone X for a few months now, and the more I do, the more I love it. Cost aside, it is the best iPhone Apple has ever made. Much of that is due to the brilliant display and radical edge-to-edge redesign of the device. That’s not to mention the incredibly accurate Face ID, which completely replaced the fingerprint reader and physical home button. But because the iPhone X is such a departure from iPhones of old, it also means that there are a ton of new tricks to learn–many of which aren’t completely obvious just from holding the device in your hands. Here’s eight of the top secret iPhone X tips and tricks I’ve discovered.

iPhone X Tips: Force Restart Your iPhone X

The lack of a home button means that many of past iPhone’s functions have been remapped to other hardware or software controls on the iPhone X. The ability to force restart the iPhone X is among those. To force restart your iPhone X now you need to press and quickly release the Volume Up button, press and quickly release the Volume Down button, and then press and hold the Side button.

iPhone X Tips: Trigger SOS

SOS is a mode on the iPhone that allows you to quickly call emergency services. To trigger SOS hold the Side button and either Volume button for six seconds. Alternately you can press the Side button five times in succession to trigger SOS.

iPhone X Tips: Control What Face ID Unlocks

Face ID replaces the way you unlock your iPhone. Now you simply look at the device instead of placing your finger on the now-gone Home button. But Face ID can also be used to make purchases in the App Store and in apps, authenticate Apple Pay payments, and autofill forms in Safari. However, you don’t need to allow Face ID to do all of these things if you don’t want. You can toggle each Face ID feature on or off by going to Settings > Face ID & Passcode.

iPhone X Tips: Always Show Notification Previews

A cool feature of the iPhone X is that notifications are automatically hidden and will only display their content if you are looking at the device. This ability means other people who have access to your phone can’t see the details of the notifications you receive on your lock screen. But you can disable this if you want to. To do so, got to Settings > Notifications > Show Previews and choose Always, When Unlocked, or Never.

iPhone X Tips: Customize The Control Center

Control Center got a major overhaul in iOS 11. Actions are now much easier to implement and have a better layout. But you can also further customize Control Center on your iPhone X if you wish. To do so got to Settings > Control Center > Customize Controls. Here you can add, subtract or rearrange controls in Control Center. For example, if you don’t use the Flashlight a lot, you can remove its button from Control center and replace it with an app you do use a lot–Notes, for example.

iPhone X Tips: Use A One-handed keyboard

The iPhone X has a seriously large screen, which sometimes makes one-handed use a bit hard if your hands are on the smaller size. To combat this, Apple has built-in a one-handed software keyboard. To access it, simply tap the emoji keyboard icon in any app that uses the keyboard and then select the left or right-handed keyboard icon to shift all the keyboard keys to one side.

iPhone X Tips: Bring Back The Home Button

Okay, you can’t obviously really bring back the physical Home button, but there is a way you can kinda of replicate it using software in iOS. To do this go to General > Accessibility > Assistive Touch and toggle it on. You'll now see a virtual Home button on your screen that you can customize to activate shortcuts.

iPhone X Tips: Force Quit Apps

With no Home button it might seem like you can’t force quit apps anymore–but you can. To do so on the iPhone X you need to bring up the app switcher. Do this by swiping up on the home bar from the bottom of any screen. Once the apps appear, swipe to the one you want to force quit and tap and hold on it. Once the minus sign in the red dot appears either tap the dot or simply swipe up on the app to force quit it.

If you accidentally deleted or lost videos on iPhone, first please check on the Recently Deleted folder. Alternatively, you can use the professional tool Gihosoft iPhone Recovery to recover deleted iPhone videos from Camera Roll or some apps.

5 Secrets for clicking the best iPhone X photographs 2018 Guide

5 Secrets for clicking the best iPhone X photographs 2018 Guide

As always Apple again took the hold of the market this year. We all know iPhone is the most gifted phone in the world. The new launches of iPhone 8, 8 plus, and X models have made massive sales and are being known for their amazing camera results. Though both iPhone 8 and 8 plus are loved by people, iPhone X is something next level due to its unique camera features.
iPhone X with face recognition, the missing main home button, and the camera features are making this smartphone way much popular than any other iPhone. Most people are still exploring the camera system of this device. All the pictures being clicked on this phone are exceptional and are being loved by the users! With this phone in hand, you can not only shoot pictures in Portrait mode, you can also expand portrait lighting, and utilize the completely remodeled back camera.

Related:

To help you shoot some really gorgeous pictures with your iPhone X, I have compiled these 5 secrets to take the best looking photos with your amazing phone. To find out these secrets, keep reading:

1: Zooming option in the Dark

I love this upgrade on iPhone X. It has made taking pictures in dark so much easier. Now you have the 2x lens in it, it works in low light. You can use both the lenses, no matter what are the lighting situations; your picture quality won’t be compromised.

2: Brighten any Scene with Flash

Usually, smartphone flashes are very harsh but Apple has introduced a new flash technology named as Slow Sync that shoots very beautiful and soft images by utilizing the phone’s innovative Quad-LED flash. It is suggested that this flash should be used in dim restaurants or after a sunset for best results.

3: Live Photo Effects

When you shoot live photos or a small video, it’s not completely a new feature that iPhone X has included, you will have a set of really nice effects using this superb technology. For example, like the DSLR camera features you can blur your background, generate a continuous Loop, or create a Boomerang which is very popular these days.

4: Portrait Modes

The Apple company made major developments in the portrait mode. The new iPhone X camera features just not have portrait mode with blurred backgrounds, it also has 5 new lighting modes for portraits, which includes natural light, contour light, studio light, stage lights and mono light (for black and white stage like photos). So, If you want to highlight your subjects, the photography level is up for you!If you accidentally deleted or lost videos on iPhone, first please check on the Recently Deleted folder. Alternatively, you can use the professional tool Gihosoft iPhone Recovery to recover deleted iPhone videos from Camera Roll or some apps.

5. Play with Burst Mode

For taking the best pictures, especially when you are traveling utilize the burst mode. You can shoot 10 photos per second with this outstanding burst mode of iPhone X. To utilize this camera feature, just hold the shutter icon for a while in your camera application. Sometimes photography is about shooting a short-lived moment.

6. How can we forget Video Modes?

There are various iPhone video modes that you can enjoy, exclusively when you are shooting a scene where this is some interesting movement or sound.
If you would like to capture something like clouds moving slowly in the sky you must go for the time-lapse mode in your iPhone X. If the scene you want to shoot is a bit fast, for instance, birds flying in the sky or landing fast in the water then you must try slow motion video mode.

Tuesday, July 10, 2018

Top 5 FIFA World Cup Songs in 2018

Top 5 FIFA World Cup Songs in 2018


As we covered above there are a total of 5 different songs for this year's World Cup. You might have only heard one of them, so here's a quick breakdown of each song.
#1 - Live It Up (Official)


The official song for the World Cup, as decided by FIFA, is Live It Up featuring some big names that most people will know. Will Smith, Nicky Jam, Era Istrefi, and Diplo, all contributed to this song.
#2 - Komanda


As the World Cup is hosted by Russia, it's only natural that they'd produce a song in their native tongue. Komanda was created by DJ Smash and has been a huge hit this year.

#3 - Colors


For the most recent World Cups, Coca-Cola has released their own anthems as a marketing tactic and 2018 was no exception. Featuring Jason Derulo and others, Colors is worth listening to!
#4 - Positivo


Positivo is a Spanish song that was released by Spanish company Telemundo that features J Balvin, Michael Brun, and Fernando Lugo.
#5 - United by Love


Sung by Natalia Oreiro, United by Love includes lyrics in English, Russian, and Spanish, which has made it popular across all nations.
Download FIFA World Cup Songs for Free


Each of these songs has the potential to be the best World Cup song of all time. Therefore, you might want to consider making one of them your iPhone's ringtone. Download all of your favourite songs (especially those above) using the MP3 Juices download tool, one of the best free music downloaders on the internet.


If you accidentally deleted or lost videos on iPhone, first please check on the Recently Deleted folder. Alternatively, you can use the professional tool Gihosoft iPhone Recovery to recover deleted iPhone videos from Camera Roll or some apps.

Saturday, July 7, 2018

iTunes Can’t Verify the Identity of the Server 2018 Guide

Other Solutions for iTunes Can’t Verify the Identity of the Server


Following are some other solutions you can try to fix iTunes can’t verify the identity of the server:
a. Clear iTunes Cache


Clearing iTunes cache is a simple fix that might solve the problem. The process is pretty straightforward and won’t take more than a minute. Follow these instructions:


Step 1: Open iTunes


Step 2: Navigate to Preferences > Advanced


Step 3: Now find and click Reset Cache option


Step 4: Click OK to close the window Sponsor Ads:Related Articles:Gihosoft Android data recovery Free


Gihosoft Free iPhone Data Recovery is a professional iPhone Data Recovery software to get back all your lost text message, photo, video, call history, note, contact and more from iPhone/iPad/iPod Touch.


Gihosoft Android data recovery Free is a super awesome software specialized in Android file recovery. With this program, you are able to recover deleted photos, music, videos, messages, contacts, call logs, WhatsApp messages, Viber chat history and more from Samsung, Huawei, LG, HTC, Motorola, Google, Oneplus, Sony, Lenovo, ZTE and other Android devices directly. Meanwhile, this Android data recovery software is available for both Windows and Mac platforms.


b. Update/Downgrade iTunes


If you did not update iTunes and the “iTunes can’t verify the identity of the server” issue occurs randomly (you can open iTunes most of the time), then it is recommended that you update iTunes to the latest version. You can either update from iTunes itself or simply uninstall the current version and then download the latest version from Apple’s official website and install it.


If the problem occurred after updating iTunes, then it is recommended that you uninstall it and then install the previous version (downgrade).
c. Tweak iTunes Automatic Update Checking


This is another simple fix. It may or may not solve your issue, but it is worth a try. Follow these instructions:


Step 1: Open iTunes


Step 2: Navigate to Preference and untick the option ‘Check for updates automatically’


Step 3: Now tick the option again


Step 4: Restart iTunes


d. Keychain Access


This is a relatively lengthy and complex process but some users have successfully managed to solve the problem with it. Follow these instructions:


Step 1: Close App Store and iTunes


Step 2: Open Keychain Access by navigating to Finder > Applications > Utilities


Step 3: Under Keychains, navigate to System Roots > Category > Certificates


Step 4: Now find the certificates that show a blue dot and a plus sign and then perform the following step in each of them:


Step 5: Open the certificate and click on the triangle. It will be shown next to ‘Trust’


Step 6: Choose ‘no value specified’ option in ‘Secure Sockets Layer (SSL)’


Step 7: Close the certificate and then open it again.


Step 8: Now choose ‘Use System Defaults’ in ‘When using this certificate’ option and then close the certificate. The plus sign and blue dot will disappear.


Step 9: Close the Keychain Access. The problem should be solved now.


The Main Causes of the iTunes Can’t Verify the Identity of the Server


Following are some main causes of the problem:


This issue may occur if the server iTunes is trying to connect is not the official server.


The host file of Windows is blocking iTunes from connecting to the internet. Some workplaces do this by putting internal resources in the hosts file.


The problem may also occur due to insecure HTTP requests being sent from iTunes to Apple, even if you have already patched your Windows’ HOSTS file.


Windows Firewall or some other third-party software is blocking internet access of iTunes.


There is a problem with Windows proxy server settings.

Best 25 Free iOS 11.3.1 Jailbreak Tweaks 2018

Please find below a brief description of each jailbreak tweak that was showcased in the video above:
#1. iCleanerPro


iCleaner Pro is like the CleanMyMac for the iPhone, iPad and iPod touch. It removes unnecessary files like unused languages, keyboards, voice control languages etc. and lots more to free up precious storage space on your iOS device. It can come very handy if you’ve very less storage space on your device.
#2. NudeKeys


NudeKeys allows you to change the look and feel of the iOS keyboard.
#3. LeadMeHome


LeadMeHome makes it easier to find app icons on your iPhone’s Home screen.
#4. SmoothCursor


With SmoothCursor, rather than the cursor jumping forward or backward when typing/deleting text, it will fluidly move forward/backward.
#5. Rocket For Instagram


If you don’t have an easy way to respring your device, it’s always nice to have one. This is another free tweak that will easily let you respring your device just by opening the Settings app and pulling down from the top.

12. 9Folderz
9Folderz brings back the iOS 9 folder style to iOS 11.

13. IGDarkMode
A dark mode for the official Instagram app. It is free via Packix repository.

14. RomanPasscode
RomanPasscode uses Roman numerals in Lock screen passcode.

15. CertRemainTime
CertRemainTime allows you to check the time remaining before the Electra app’s certificate expires.

16. TweakCompatible
TweakCompatible adds a way to check tweak compatibility.

17. Flame


Flame brings a bunch of great new features missing from Cydia to make it easier for users to perform various tasks along with improving the user experience.

18. Cylinder
Cylinder is an amazing jailbreak tweak that animates the Home screen app icons as you navigate from one page to another. It provides dozen of animation effects that bring a fancy look to your Home screen.

19. Filza
Filza File Manager, a well-known iFile alternative for jailbroken devices that gives you acces to the file system.

20. Dark Messages
As the name suggests, Dark Messages brings dark mode to the Messages app.

21. Floating Dock
Floating Dock you get the floating design of the iPad’s dock on your iPhone

22. SwipeForMore
SwipeForMore lets you install or remove Jailbreak Tweaks in Cydia with a swipe.

23. Goodges
Goodges displays the notification count of an app in its Home screen label.

24. Safari Full URL
It shows the full URL in Safari.

25. NoPageDots
It removes the page dots from the iPhone Home screen.

In addition to the jailbreak tweak, the jailbroken iPhone has been customized using Anemone, a WinterBoard alternative. The theme that has been used in Muze 3.

Let us know your favorite iOS 11.3.1 jailbreak tweaks in the comments below.


Sponsor Ads:
Gihosoft Free iPhone Data Recovery is a professional iPhone Data Recovery software to get back all your lost text message, photo, video, call history, note, contact and more from iPhone/iPad/iPod Touch.


Gihosoft Android data recovery Free is a super awesome software specialized in Android file recovery. With this program, you are able to recover deleted photos, music, videos, messages, contacts, call logs, WhatsApp messages, Viber chat history and more from Samsung, Huawei, LG, HTC, Motorola, Google, Oneplus, Sony, Lenovo, ZTE and other Android devices directly. Meanwhile, this Android data recovery software is available for both Windows and Mac platforms.

Friday, July 6, 2018

Recover Deleted Notes on iPhone without/from Backup


Recover Deleted iPhone Notes from "Recently Deleted" Folder

It is possible that the missing notes could still be in the Notes App and as such, quite easy to recover. They may be available in the "Recently Deleted" folder where all deleted Notes are stored for a period of 30 days. Here's how to check.
Step 1: Go to the "Recently Deleted" folder in the Notes app.
Step 2: Click on the "Edit" button in the upper right corner.
Step 3: Select the notes you want to recover and click on "Move To…" button in the lower left corner.
Step 4: Choose a folder you want to move the deleted notes to. Then go to the folder to view the undeleted notes.
Note: Notes in the "Recently Deleted" folder are permanently deleted after 30 days.
check Recently Deleted Folder for notes

Recover Deleted Notes on iPhone from an iTunes Backup

3.1 Restore iPhone from iTunes Backup

If you regularly backup your iPhone data to iTunes, it is likely that your deleted Notes could be in your iTunes backups. Here’s how to recover them from iTunes.
Step 1: Connect the iPhone and Open iTunes on the computer you synced your device with.
Step 2: Click "Restore Backup" to restore the device to the latest iTunes backup.
itunes backup
But there is one disadvantage of recovering deleted notes from iTunes backup. The iTunes backup will overwrite the existing data on your iPhone. So please back up the existing iPhone data before recovery to ensure no important files will be lost.
Sponsor Ads:
Gihosoft Free iPhone Data Recovery is a professional iPhone Data Recovery software to get back all your lost text message, photo, video, call history, note, contact and more from iPhone/iPad/iPod Touch.
Gihosoft Android data recovery Free is a super awesome software specialized in Android file recovery. With this program, you are able to recover deleted photos, music, videos, messages, contacts, call logs, WhatsApp messages, Viber chat history and more from Samsung, Huawei, LG, HTC, Motorola, Google, Oneplus, Sony, Lenovo, ZTE and other Android devices directly. Meanwhile, this Android data recovery software is available for both Windows and Mac platforms.


Saturday, June 23, 2018

How to Backup Contacts to iCloud from iPhone & How to View Them?


How to Back Up iPhone Contacts to iCloud?

  • First, you'll need to ensure that you have a solid connection by hooking your iPhone up to a Wi-Fi network. Once you're on Wi-Fi, you'll need to go to 'Settings', hit your name, and then touch 'iCloud'.
  • Once you're in the 'iCloud' tab, you'll see 'iCloud Backup' with a little toggle button right beside it. All you need to do is make sure that is turned on (toggle button should be green).
  • Once you've made sure the iCloud Backup is turned on, you'll need to tap 'Back Up Now' which is on the same screen. Remain on a Wi-Fi network until the backup is complete.
Back Up iPhone Contacts to iCloud

2. How to View Contacts in an iCloud Backup?

There are two main ways to view contacts in an iCloud backup which are completely free of charge.

1 Restore the iCloud Backup to iPhone

This one is simple to operate. You'll want to open Settings on your iPhone, and then follow this:
  • Go to General > Reset > Erase All Content and Settings then choose 'Erase Now'. Notice that Apple offers the function to backup and then erase your iPhone and you can choose it also if you need.
  • Next, go into 'Apps & Data', touch 'Restore from iCloud Backup' and then log in your iCloud account. You'll then need to select the backup that you want to restore from the list provided.
  • After the restore is complete you can view your contacts.
restore iCloud backup to check contacts
Note
You cannot restore only contacts from iCloud backup to your iPhone. Apple’s restore function doesn’t allow restoring certain types of data. If you need to do so, check the link about how to restore Specific App from iCloud Backup.
Gihosoft iPhone Data Recovery is a professional iPhone Data Recovery software to get back all your lost text message, photo, video, call history, note, contact and more from iPhone/iPad/iPod Touch. It offers a full solution to recover your lost data in different tough situations. Besides recovering data directly from iPhone, iPad and iPod touch, it also allows you to recover data from iCloud and iTunes backup files.

iOS 13.2 and iPadOS 13.2 Beta 2: What’s New

Apple today released the second developer beta of iOS 13.2 and iPadOS 13.2 . While the highlight of the first developer beta of iOS 13.2 int...